Are you a photographer that is sick of paying high rent for studio space?
You should consider adding your own photo studio right at home. It will save you time and money. Plus, you can do it all yourself.
If you want to up your photography game, consider setting up a studio in your house for ease and flexibility. And, make sure you have the right equipment and set up to make the most out of your new home studio.
Keep reading for our guide to making a DIY photography studio that will have you taking amazing shots from your home in no time.
Choose a Functional Space
The first thing you’ll want to decide is where you will set up your photo studio setup.
Choose a place you can dedicate to your photography that will be functional both for your photoshoots and your home life. The area and space you choose will depend on how much room you need.
Consider what kind of photographer you are, and what you plan on shooting in this space to determine how much space you’ll need.
If you shoot objects, your studio may be smaller than that of a portrait or family photographer. If you work with clients in your studio, make sure the space is roomy, inviting, and comfortable.
How to Manage Your Photo Studio
Because your photo studio is set up in your home, it’s likely smaller than a setup would be in a more commercial photography space.
Because of this, it’s a good idea to find equipment that will help you take great photos despite the small space. If you still want to be able to take larger portraits, it may be wise to invest in a lens with shorter focal length, we suggest about 80-100mm.
You will also want to make sure the space of your choice has multiple outlets around. This will allow you to move equipment around with ease. Getting a few extension cords can help make this mobility a bit more flexible.
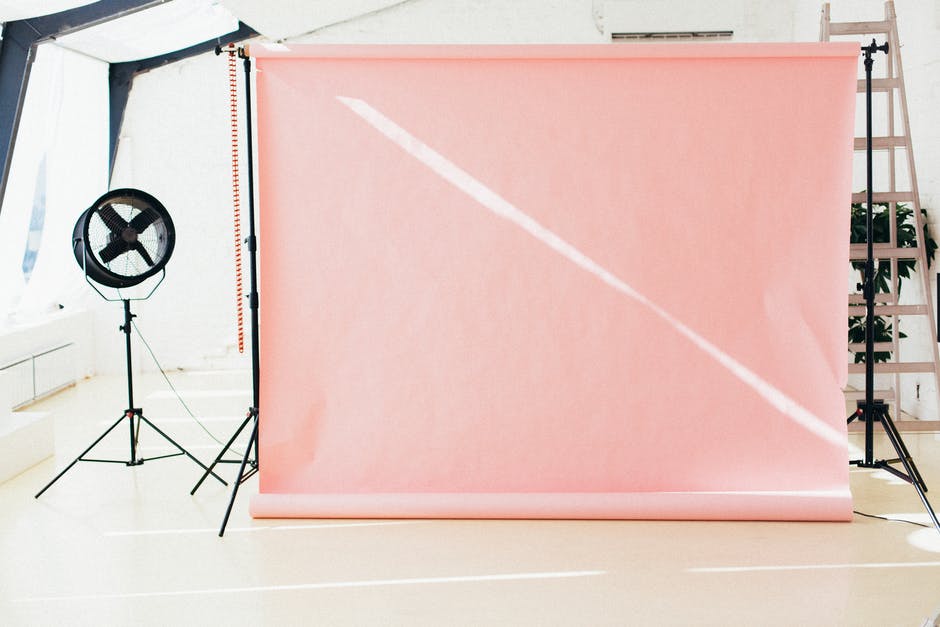
Having a step ladder in your studio can help you to change the orientation and settings on your lighting. This can also help when you want a bird’s eye shot of your subject.
Using a powerful box fan can not only add some motion to your subject, but it can also make your studio more comfortable for you and your client or model. Using strobe and studio lights can make the room get hot and uncomfortable pretty quickly, especially in a smaller space.
Find the Best Lighting
Lighting can make or break a photo, so make sure you choose the best lighting so that you can get amazing shots in your DIY photo studio.
A room with window lighting can be great for certain shots. If you install your photo studio near a window, make sure that you have a blackout curtain handy.
At times, window lighting can be soft and even, letting you ditch your flash and take advantage of warm natural lighting. At other times, this light can be ambient and hard to control, which is when your blackout curtain will come in handy.
Ambient lighting refers to light that ends up in a photo due to things in the room like window light, and mirrors.
Consider installing mirrors for clients outside your studio to avoid these issues. To avoid ambient lighting, you’ll also want to turn all the rooms lights off, and only use your photography lighting.
Helpful Lighting Equipment
Lighting fixtures and flash cameras are a must for your photo studio.
Speed lights are another great addition, as they are compact and easy to move around your studio when you need adjustments to the lighting. Studio strobes are another great addition to a home studio, as they give off a powerful light.
Light modifiers can also be a great investment. These modifiers are placed over the flash to help you to control the light coming from your camera.
An umbrella light modifier will help to get light over a large area or subject. Softbox modifiers are helpful to control where the light shines. These modifiers can be attached to studio strobes and speed lights.
If you’re building your photo studio on a budget, try looking online for used, refurbished lighting equipment. Additionally, light presets can help to adjust your photos with different filters. Check out these presets to learn more.
Have Props and Backdrops on Hand
Backdrops can help to make your at-home studio photoshoots more clean and professional. Neutral backdrops are great to have on hand when you want to play it safe and keep the look simple.
Purchasing gelled lights and springing them off of neutral backgrounds can help to change the general color of the backdrop when you need to change it up.
Photo editors like Photoshop can also help to change the saturation or brightness of your backdrops. A collapsable backdrop can be helpful for easy storing and setup.
Having props on hand will help you to spruce up your photos when necessary.
Clothing, accessories, and furniture can help when shooting people. If you shoot products, having plants, and other decors around can help you to add some color and create a story with your images.
Make Your Own DIY Photography Studio
If you’re interested in making your own at home DIY Photography Studio, keep this guide in mind. Make sure you know the best equipment to get, how you will set up your space as well as some space-saving tricks so that you can have a successful at-home studio.
Having an at-home studio can offer convenience, and can also allow you to save money on studio rental space. Bring your career and creativity into your home by setting up your own photography studio today!
For more interesting articles on tons of great topics, browse our site.